

- Scenarios — define personas, missions, and success criteria for testing AI Agents.
- Simulation Runs — simulate scenarios to evaluate the performance of AI Agents.
- Simulations — the compilation of multiple simulation runs displaying different AI Agent behaviors in the same scenario. Each simulation run provides unique test outcomes for analysis. Additionally, you can automate testing by scheduling periodic simulations, and ensure continuous validation of your AI Agent’s performance and reliability.
Key Benefits
- Realistic End-to-End Testing. Simulate full conversations, from greetings to resolutions. Use multiple personas to test how your AI Agent handles different user personas and Scenarios.
- Simulations Across Multiple Interfaces. Run simulations via the Simulator or the Interaction Panel and view all simulated conversations in the Conversations Explorer, Simulator, or Interaction Panel for quick outcome review.
- Early Issue Detection and Optimization. Detect gaps, edge cases, and quality issues before deployment to improve reliability and deliver a better user experience.
- Faster, Automated QA. Automatically test AI Agents across environments, ensuring high coverage and consistent quality.
- Scheduled Simulations. Schedule simulations to automate periodic tests at a specified frequency. Regular testing helps ensure that new deployments work as expected.
Prerequisites
- To start a simulation, you need an LLM that supports the AI Agent Node feature.
- To generate scenarios automatically, you need to:
- Configure an LLM for design-time features. Select the platform-provided LLM or another model that supports design-time features.
- Ensure that your Project includes a Flow with an AI Agent Node.
Restrictions
- You can’t run simulations using Snapshots in the Interaction Panel.
- The following features aren’t supported:
- Voice interactions. The Simulator only supports text-based conversations.
- Handovers to human agents. The Interaction Panel will show the message
Agent Handover is not supported in the Interaction Panel, please use the Webchat or another channel.
Limitations
- The maximum number of scenarios per Project is 100. You can change this limit as follows:
- For SaaS installations, contact Cognigy technical support.
- For on-premises installations, assign a new limit to the
MAX_SIMULATIONS_PER_PROJECTenvironment variable invalues.yaml.
- The maximum number of runs per simulation is 150.
- The maximum number of success criteria per scenario is 10.
- The maximum number of CSV transcripts you can upload at a time is 10.
- You can set only 1 schedule per scenario.
How the Simulator Works
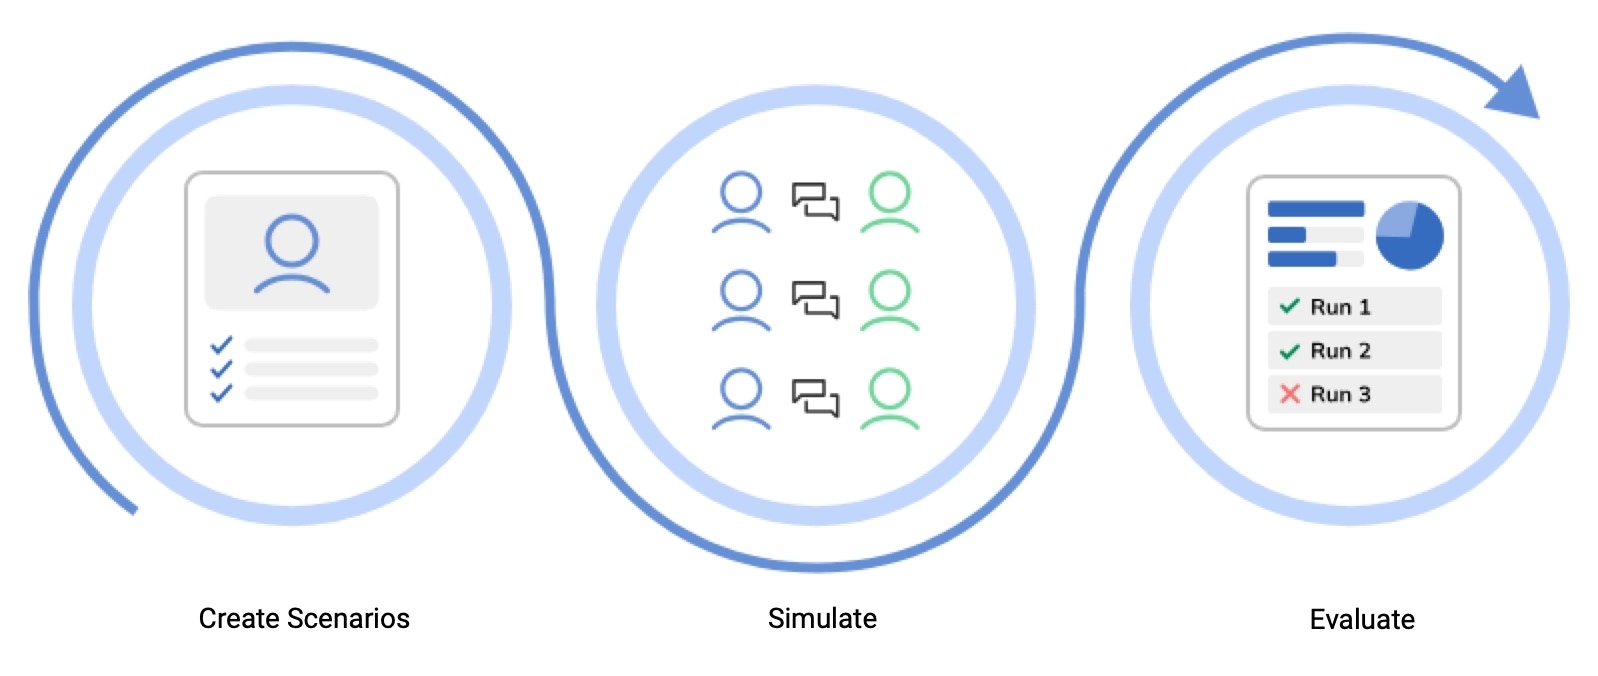
- Create a scenario. Set the persona, mission, and success criteria.
- Simulate. Start the simulation and let the AI Agent interact with the persona you created. Run the simulation multiple times to gather more accurate insights.
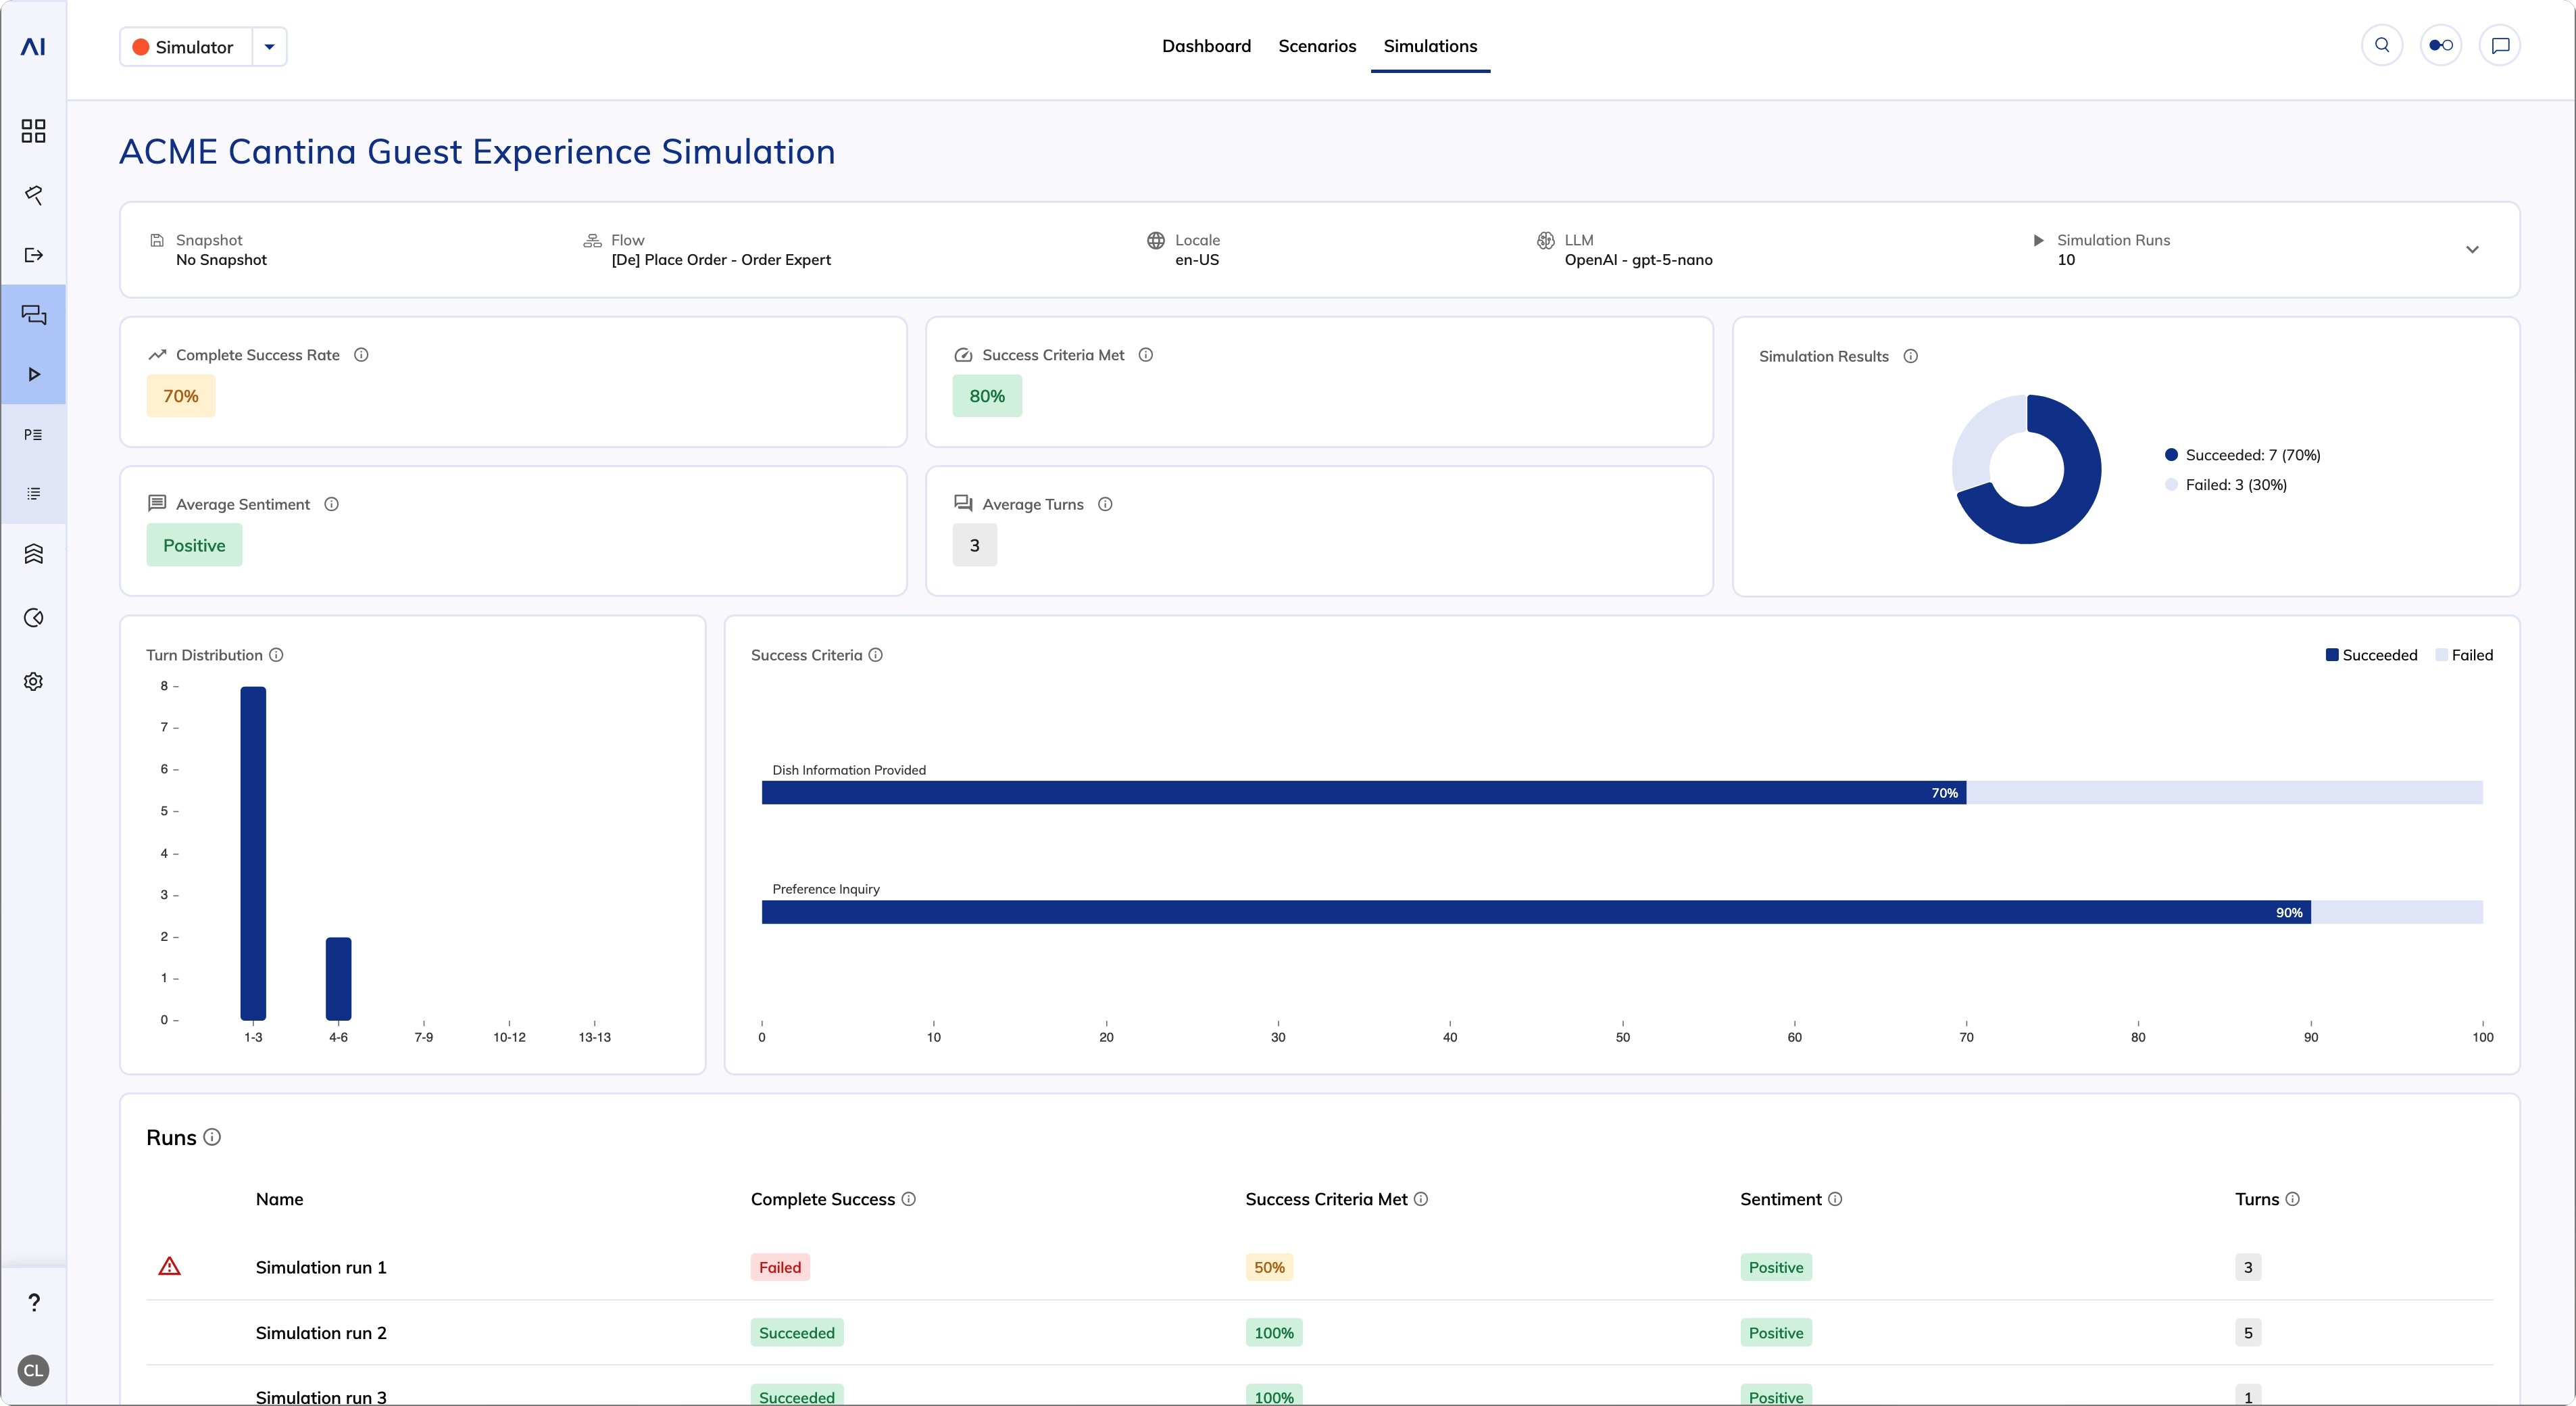
- Evaluate. View key metrics on the Simulation dashboard, such as complete success rate, average sentiment, and number of turns. You can then adjust the Flow logic, training data, or system prompts based on the results. Rerun simulations to verify improvements.
Working with Simulations
- GUI
- API
1. Create a Scenario
1. Create a Scenario
In the Simulator, you can create a scenario automatically or manually. Alternatively, you can create a scenario from a transcript in the Conversations Explorer.To create a scenario, follow these steps:
- Automatically
- Manually
- From Transcripts
- In your Project, go to Test > Simulator and click + New Scenario.
- In the Generate from AI Agent section, click Generate.
- Fill in the following fields:
- Flow – select a Flow containing an AI Agent to base your scenario on. Ensure the Flow is already configured.
- AI Agent Job Node – select the AI Agent Node to be analyzed for scenario creation. The AI Agent Job Node must be already configured in the Flow.
- Click Generate. Cognigy.AI generates a scenario based on the AI Agent Job Node configuration. Review the generated scenario and adjust it if necessary.
- Select the generated persona description, mission, and success criteria. If necessary, edit them manually or automatically by clicking the Regenerate text button on the right-hand side of each field.
2. Simulate
2. Simulate
After creating a scenario, you can start a simulation manually or schedule regular simulations.To start a simulation, follow these steps:
- Click the scenario from the list to open the Start Simulation window.
- In the Start Simulation window, configure the simulation:
- Simulation Name – enter the name of the simulation. The name should reflect the test scenario and focus area. Example:
Menu Exploration – Exotic Dish Focus. - Snapshot – select the Snapshot for the simulation. Use this option to test a Flow from a specific version rather than the current one.
- Flow – select the Flow for the simulation.
- Locale – select the Locale that defines the language of the AI Agent and simulated user.
- LLM – select the model to manage the simulated conversation.
- Number of Simulation Runs – set how many times the simulation runs. The default value is 10. Use multiple simulation runs to test conversation variations.
- Simulation Name – enter the name of the simulation. The name should reflect the test scenario and focus area. Example:
- (Optional) In the Advanced Settings section, configure additional parameters:
- AI Agent Output Timeout – set the maximum time the AI Agent has to respond to each user input during the simulation. The default value is 60,000 milliseconds. The minimum value is 20,000 milliseconds.
- Custom Data Payload – define a JSON object that is injected into every input message during a simulation. This parameter enables context-aware testing, for example, testing different user types, A/B scenarios, or personalized Flows, without changing the Flow itself. Examples of custom data payloads:
- Click Start Simulation. Once the simulation starts, you’ll be redirected to the simulation overview to view the real-time results. After creating the Project’s first simulation, the Simulator Dashboard is added to the Simulator interface.
3. Evaluate
3. Evaluate
The simulation overview provides the following key metrics:
In the Runs table, find the simulation runs marked as
Failed in the Complete Success column. Click a simulation run to open the simulated conversation in a panel on the right. In the right-side panel, hover over the Failed status next to the success criterion to see a tooltip explaining why the simulation run failed to meet the success criterion.To filter simulation runs, click a bar or a slice on the charts that represents the data you want to investigate.You can also view the simulated conversation in the Conversations Explorer by toggling on Interaction Panel / Playbooks / Simulations in the Endpoint filters.Additionally, you can view key metrics, performance trends, and scheduled simulations across simulations in the Simulator dashboard.Schedule Simulations
After you’ve created a scenario, you can schedule simulations to run automatically at a specified frequency.- GUI
- API
To schedule a simulation, follow these steps:
- Hover over the scenario for which you want to schedule a simulation and select
 > Schedule on the right. The Schedule Configuration panel opens.
 - Configure the simulation and schedule settings on the tabs in the Schedule Configuration panel:
On the Run Config Tab
On the Run Config Tab
- Configure the following:
- Simulation Name — enter the name of the simulation. The name should reflect the test scenario and focus area. Example:
Menu Exploration – Exotic Dish Focus. The time and date are appended to the name after the simulation is finished. The full simulation name is displayed on the Simulations tab and Simulator dashboard. - Snapshot — select the Snapshot for the simulation.
- Flow — select the Flow for the simulation.
- LLM — select the model to manage the simulated conversation.
- Simulation Name — enter the name of the simulation. The name should reflect the test scenario and focus area. Example:
- (Optional) In the Advanced Settings section, configure additional parameters:
- AI Agent Output Timeout – set the maximum time the AI Agent has to respond to each user input during the simulation. The default value is 60,000 milliseconds. The minimum value is 20,000 milliseconds.
- Custom Data Payload – define a JSON object that is injected into every input message during a simulation. This parameter enables context-aware testing, for example, testing different user types, A/B scenarios, or personalized Flows, without changing the Flow itself. Examples of custom data payloads:
On the Schedule Tab
On the Schedule Tab
- Toggle on Enable Schedule to activate the schedule.
- Configure the following:
- Frequency — select from the following options:
- Daily — this option is selected by default.
- Every 3 days
- Weekly
- Bi-weekly
- Monthly
- Time — select the time when the simulation starts.
- Next Scheduled Run — shows the date and time of the next simulation, based on the Frequency and Time parameters.
- Number of Simulation Runs — set how many times the simulation runs. The default value is 10. Use multiple simulation runs to test conversation variations.
- Email Notifications — enter the email addresses to receive notifications about the simulation runs and press Enter.
 appears next to the scenario name on the Scenarios tab. Hover over the icon to view the next scheduled simulation.
Example
This example shows how to create scenarios and run simulations using an AI Agent Flow. We’ll work with Sophie, the Restaurant Guide from the Job Market. Sophie assists users with dinner planning and restaurant recommendations.- Set up a Flow that uses Sophie as the AI Agent.
-
Set up three simulations with different personas to test various use cases:
Persona 1. 🧑🍳 Alex – The Curious Foodie
Persona 2. 👨 Jordan – The Corporate Guest
Persona 3. 👩 Maya – The Tourist Planner
-
Run simulations with the following settings:
- Check the results on the Simulation dashboard. Open each simulation run to review the outcomes. Pay attention to failed runs. For example, look at the simulation for the persona Maya – The Tourist Planner.
Troubleshooting
Common Issues
Common Issues
Azure Content Filter Error
Azure Content Filter Error
When you use an Azure OpenAI LLM for simulations, you may receive the following error message:
The response was filtered due to the prompt triggering Azure's content management policy.This error isn’t caused by Cognigy.AI, it occurs because Azure’s content filter blocks the LLM prompt, also called system message, according to your subscription’s safety policy. The LLM prompt includes your simulation settings, for example, personas, missions, and success criteria.Best PracticesAzure’s content filter blocks any content that it considers unsafe or ambiguous, including LLM prompts. The exact rules, scoring methods, or trigger terms used for the content filter aren’t disclosed. However, they include best practices in their system message documentation. The following table shows issues and best practices while configuring the scenario.How to Resolve
- Review the simulation’s persona, mission, and success criteria. Make sure they comply with Azure’s best practices.
- Ask your Azure OpenAI administrator to review the content filter settings for the environment you’re using.