> ## Documentation Index
> Fetch the complete documentation index at: https://docs.cognigy.com/llms.txt
> Use this file to discover all available pages before exploring further.
# Speech Services
> Integrate speech-to-text and text-to-speech vendors in Voice Gateway. Configure STT/TTS providers, voices, accents, and languages for AI voice agents.
Updated in 2026.15
Elevenlabs deprecated and removed the following models:
**Deprecated:** Turbo v2 and Turbo v2.5. If your speech service uses either of these models, ElevenLabs recommends migrating to Flash v2 and Flash v2.5.
*Removed:*\* Monolingual v1 and Multilingual v1. If your speech service uses either of these models, migrate to the newer Multilingual v2.
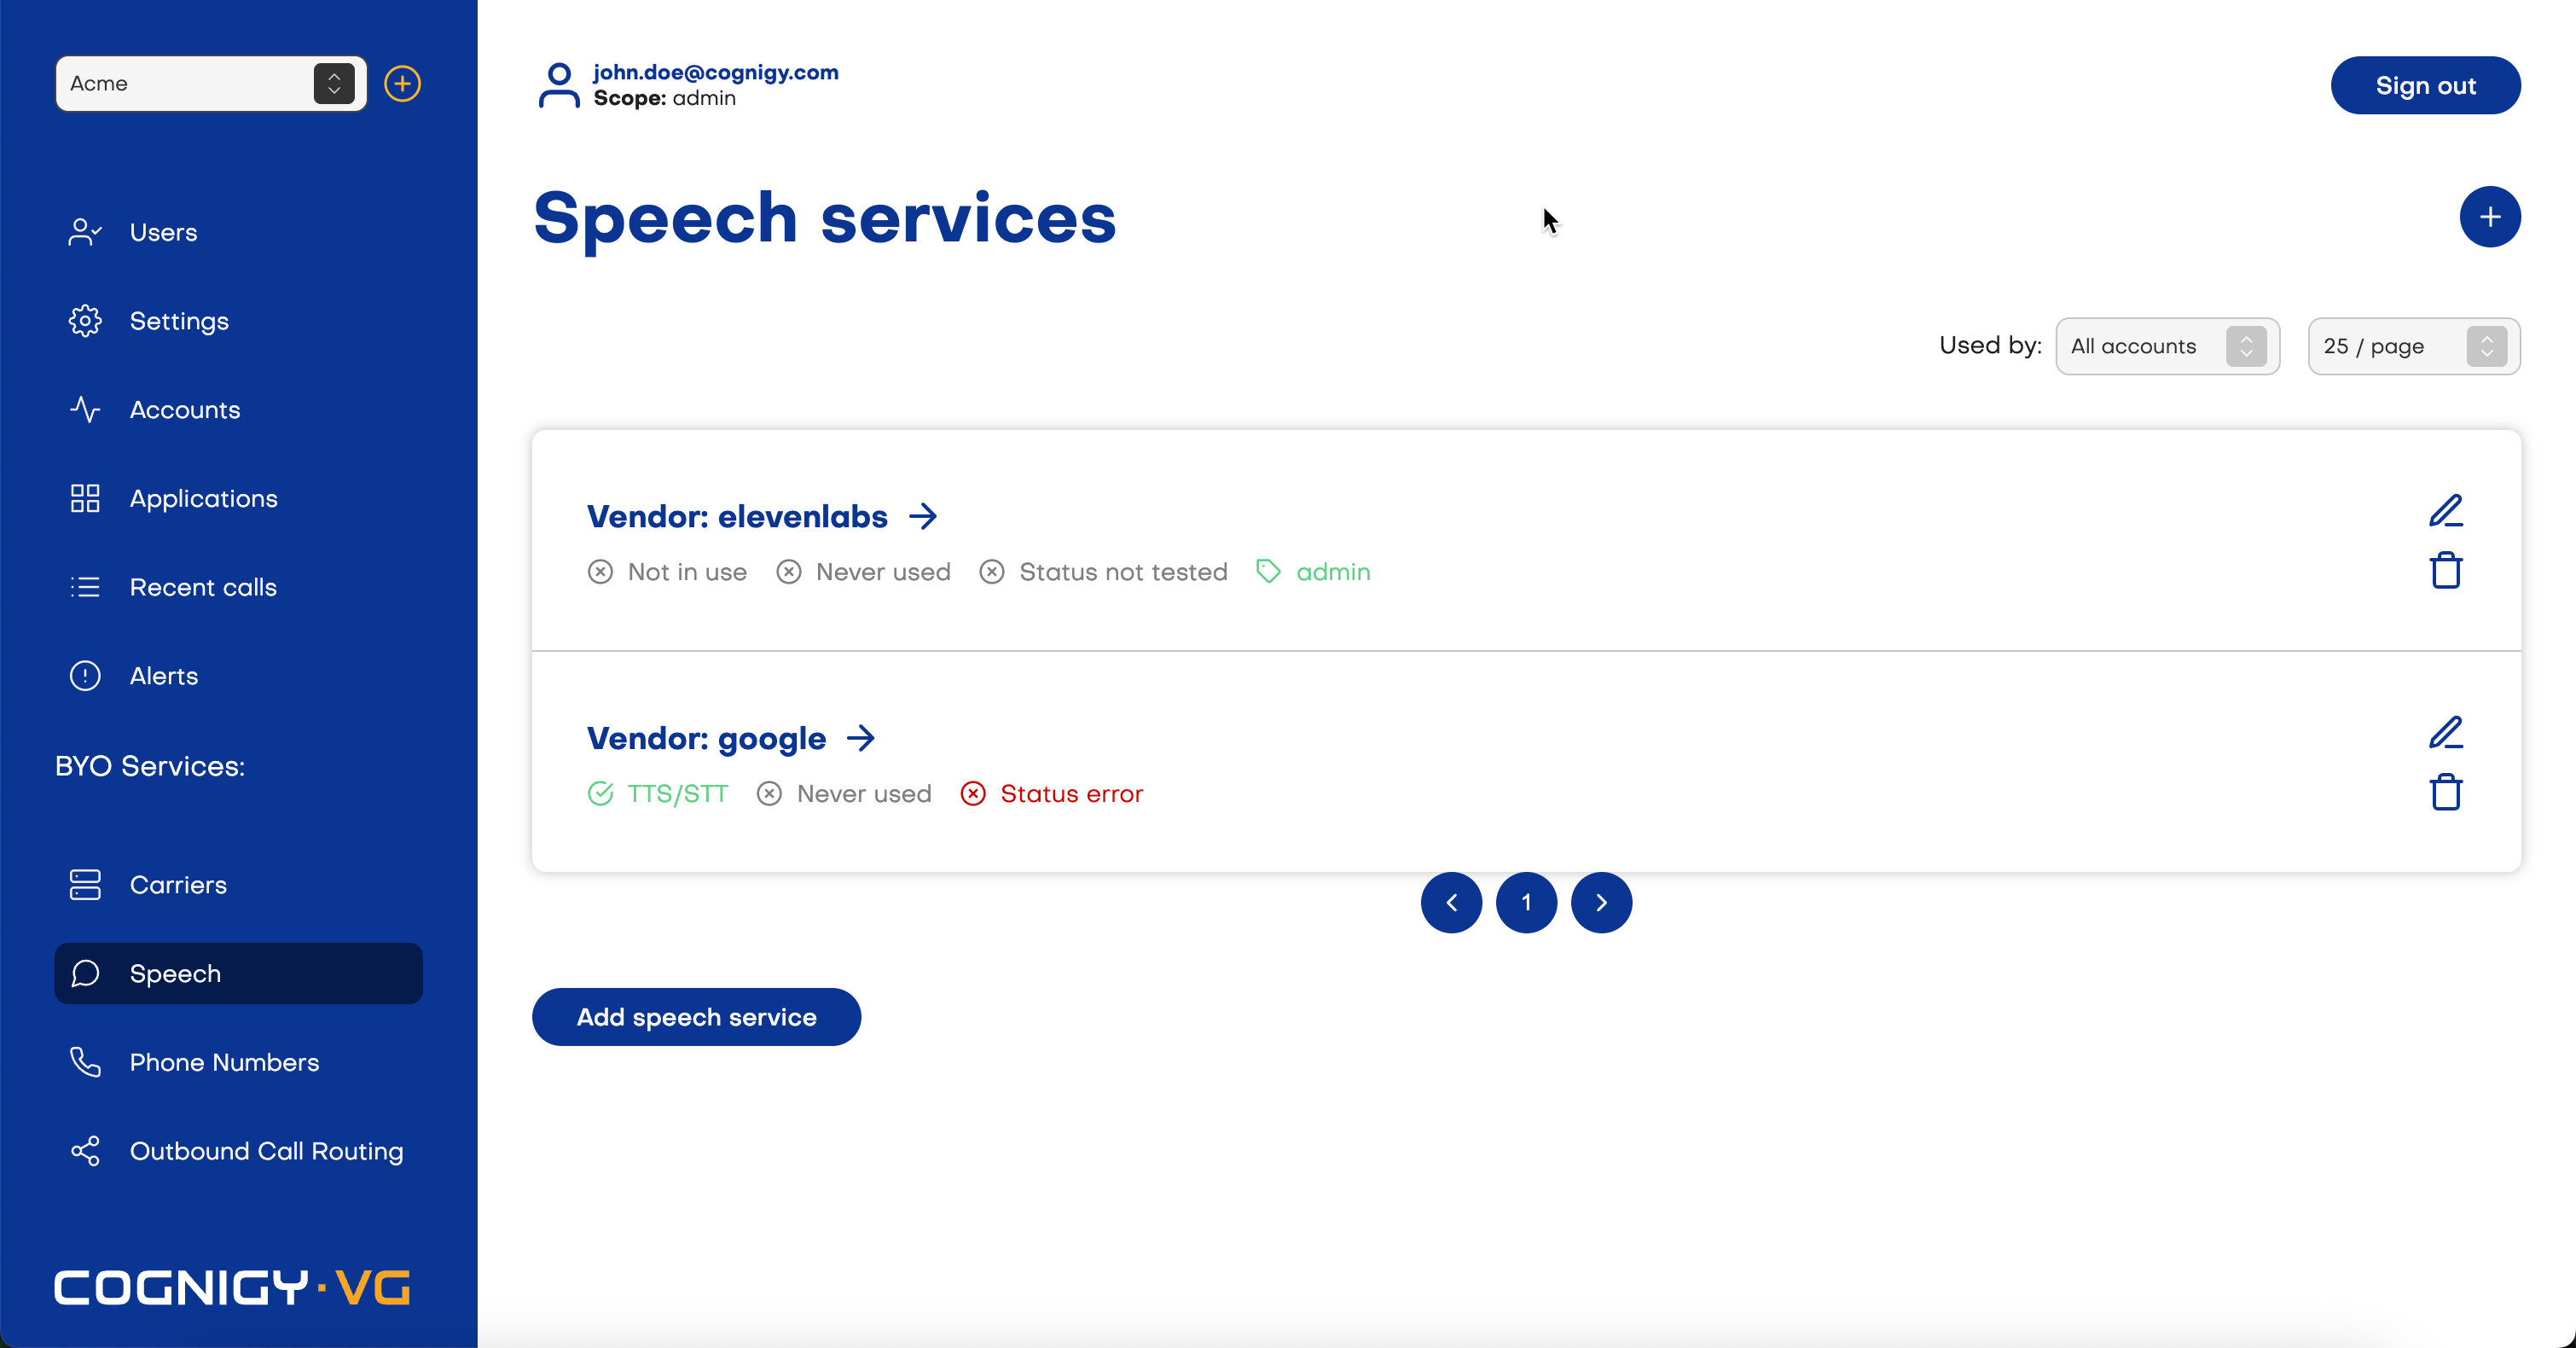
**Speech services** integrate Speech-to-Text (STT) or Text-to-Speech (TTS) vendors in the Voice Gateway Self-Service Portal. To ensure the AI Agent gets a voice, a speech service must be selected within the [Application](/voice-gateway/webapp/applications). By connecting with a speech vendor of your choice, you can select between multiple voices, genders, accents, and languages. You can add multiple speech vendors to the Voice Gateway Self-Service Portal, or install multiple configurations of one speech vendor, to quickly switch between different setups.
Voice Gateway supports the following speech vendor configurations:
* [Cloud-based](#cloud-based-speech-services)
* [On-premises](#on-premises-speech-services)
For the list of supported vendors and their Speech-To-Text and Text-To-Speech capabilities, see the [TTS and STT Vendors](/voice-gateway/references/tts-and-stt-vendors) reference.
If you need to create multiple speech services from the same vendor, use the **Label** field to create a unique speech service.
After creating a speech service, you can edit or delete it.
If you have an Account scope, you can only edit speech services you have created, as well as speech services created by other users with the same scope. You can still use and view speech services shared by Service providers or Admins.
 ## Cloud-Based Speech Services
To configure the connection for a cloud-based speech service:
1. In the left-side menu of the Voice Gateway Self-Service Portal, select **Speech**.
2. Click **Add Speech Service** and select your preferred vendor.
3. Select the account you want to use it with.
4. *(Optional)* If you need to create multiple speech services from the same vendor, use the **Label** field to create a unique speech service.
5. Select **Speech-To-Text**, **Text-To-Speech** or both, depending on your use case.
1. *(Optional)* If you enable TTS, the **Enable text-to-speech streaming** option appears. Activate this option to enable TTS streaming for your voice AI Agent. Note that some providers might not support TTS streaming. For more information, see [TTS Streaming](/voice-gateway/streaming).
6. Follow further instructions according to your selected vendor:
1) Make sure you have set the following [IAM policies](https://docs.aws.amazon.com/IAM/latest/UserGuide/reference_policies_elements_statement.html):
To use Amazon Polly as a TTS service, you need at least the following IAM policy:
```json theme={null}
{
"Version": "2012-10-17",
"Statement": [
{
"Effect": "Allow",
"Action": [
"polly:SynthesizeSpeech",
"polly:DescribeVoices"
],
"Resource": "*"
}
]
}
```
Where:
* `polly:SynthesizeSpeech` — allows the service to synthesize speech.
* `polly:DescribeVoices` — allows the service to list the available voices.
* `*` — allows the service to access all resources. AWS doesn't support resource-level restrictions.
Voice Gateway uses real-time streaming transcription for speech recognition. To use Amazon Polly's speech services, you need to configure Amazon Transcribe's STT policy to allow real-time streaming transcription. To do so, configure at least the following IAM policies:
```json theme={null}
{
"Version": "2012-10-17",
"Statement": [
{
"Effect": "Allow",
"Action": [
"transcribe:StartStreamTranscription",
"transcribe:StartStreamTranscriptionWebSocket"
],
"Resource": "*"
}
]
}
```
Where:
* `transcribe:StartStreamTranscription` — allows the service to start a real-time streaming transcription.
* `transcribe:StartStreamTranscriptionWebSocket` — allows the service to start a real-time streaming transcription via WebSocket.
* `*` — allows the service to access all resources. AWS doesn't support resource-level restrictions.
2. Enter the Access Key in the **Access key ID** field. For more information on AWS Access Keys, read the [Amazon AWS](https://repost.aws/knowledge-center/create-access-key) documentation.
3. Enter the Secret Access Key in the **Secret access key** field.
4. Select a region from the **Region** list.
Use Deepgram for TTS. For STT capabilities, use Deepgram Flux, which is optimized for transcription accuracy, real-time streaming, and processing large volumes of audio.
1. Enter an API key in the **API key** field. This key also works for Deepgram Flux. For more information on API keys in Deepgram, read the [Deepgram](https://developers.deepgram.com/docs/create-additional-api-keys) documentation.
2. From the **Region** list, select one of the following regions to host the data processed by Deepgram:
* **United States** — points to the endpoint for Deepgram services located in the U.S.
* **EU** — points to the endpoint for Deepgram services located in the EU.
1. Enter an API key in the **API key** field. If you have configured Deepgram before, you can reuse the same key for Deepgram Flux because the API key works for both Deepgram and Deepgram Flux. For more information on API keys in Deepgram, read the [Deepgram](https://developers.deepgram.com/docs/create-additional-api-keys) documentation.
2. From **Region** list, select one of the following regions to host the data processed by Deepgram Flux:
* **United States** — points to the endpoint for Deepgram Flux services located in the U.S.
* **EU** — points to the endpoint for Deepgram Flux services located in the EU.
1. Select your language model from the **Model** list. The following TTS models are supported:
* Multilingual v3
* Multilingual v2
* English v2
* Turbo v2 (deprecated)
* Turbo v2.5 (deprecated)
* Flash v2
* Flash v2.5
2. Select **Use hosted ElevenLabs service** and configure the following:
* **Region** — select the region to host the data processed by ElevenLabs:
* **Global** — points to the endpoint for ElevenLabs services located in the U.S.
* **EU**[1](#footnote1) — points to the endpoint for ElevenLabs services located in the EU. Selecting data residency is an ElevenLabs Enterprise feature. For more information, read the ElevenLabs documentation on [Data Residency](https://elevenlabs.io/docs/product-guides/administration/data-residency). The EU environment doesn't support legacy voices. Legacy voices include a legacy tag in the voice selection in Cognigy.AI. If you select the EU region, ensure you don't select legacy voices.
* **API key** — enter an API key. For more information on ElevenLabs API keys, read the [ElevenLabs](https://help.elevenlabs.io/hc/en-us/articles/14599447207697-How-to-authorize-yourself-using-your-xi-api-key) documentation.
1. Upload your Service Key to the **Service key** field. For more information on creating Service Keys in Google Cloud, read the [Google Cloud](https://cloud.google.com/iam/docs/keys-create-delete) documentation.
1. Select **Use hosted Azure service**.
2. Select a region from the **Region** list.
3. Enter an API key in the **API key** field. For more information on linking API keys, read the [Microsoft Speech Services Billing](https://learn.microsoft.com/en-us/azure/ai-services/speech-service/speech-container-howto#billing-arguments) documentation.
4. *(Optional)* Select a custom voice model for TTS by providing a custom voice endpoint ID in the **Custom voice deployment ID** field.
5. *(Optional)* Select a custom speech model for STT by providing a custom speech endpoint ID in the **Custom speech endpoint ID** field.
1. Enter the client ID in the **Client ID** field. You can obtain the client ID as well as the secret key from your Nuance program manager. For more information, read the [Nuance](https://docs.nuance.com/digital-engagement/APIs/UMAPI/token-auth.html) documentation.
2. Enter the secret key in the **Secret** field.
This feature is hidden behind the feature flag. Activate Speechmatics:
* If you have a SaaS installation, contact [Cognigy technical support](/help/get-help).
* If you have an on-premises installation, specify the following feature flags in `values.yaml` for the following products:
```yaml Voice Gateway theme={null}
webapp:
extraEnvVars:
- name: ENABLE_SPEECHMATICS
value: "true"
```
```yaml Cognigy.AI theme={null}
cognigyEnv:
FEATURE_ENABLE_SPEECHMATICS_SPEECH_VENDOR: "true"
```
1. Enter an API key in the **API key** field. For more information on Speechmatics API keys, read the [Speechmatics Authentication Guide](https://docs.speechmatics.com/get-started/authentication#create-an-api-key).
2. From **Region** list, select one of the following regions to host the data processed by Speechmatics:
* **EU (EU2 - On Demand)** — points to the on-demand endpoint for Speechmatics services located in the EU.
* **EU (EU1 - Enterprise)** — points to the enterprise endpoint for Speechmatics services located in the EU.
* **US (US1 - Enterprise)** — points to the enterprise endpoint for Speechmatics services located in the U.S.
Save your changes by clicking **Save**.
Once you have created a speech service, add this service to the [Application](/voice-gateway/webapp/applications).
## On-Premises Speech Services
1. In the left-side menu of the Voice Gateway Self-Service Portal, select **Speech**.
2. Click **Add Speech Service** and select your preferred vendor.
3. Select the account you want to use it with.
4. *(Optional)* If you need to create multiple speech services from the same vendor, use the **Label** field to create a unique speech service.
5. Select **Speech-To-Text**, **Text-To-Speech** or both, depending on your use case.
1. *(Optional)* If you enable TTS, the **Enable text-to-speech streaming** option appears. Activate this option to enable TTS streaming for your voice AI Agent. Note that some providers might not support TTS streaming. For more information, see [TTS Streaming](/voice-gateway/streaming).
6. Follow further instructions according to your selected vendor:
1) Select **Use on-prem Deepgram container**.
2) Enter the container URI for STT and TTS in the **Container URI** field.
3) Select **Use TLS**, if required.
1. Select **Use on-prem TTS** and enter the IP port in the **TTS URI** field.
2. Select **Use on-prem STT** to enter the IP port in the **STT URI** field.
1. Select **Use Azure Docker container (on-prem)**.
2. Enter the container URL for TTS in the **Container URL for TTS** field.
3. Enter the container URL for STT in the **Container URL for STT** field.
4. Enter an API key in the **Subscription key** field, if required. Whether the subscription key is required will depend on your custom on-premises setup. For more information on Microsoft Azure Subscriptions, read the [Subscriptions in Azure API Management](https://learn.microsoft.com/en-us/azure/api-management/api-management-subscriptions) documentation.
Save your changes by clicking **Save**. Once you have created a speech service, add this service to the [Application](/voice-gateway/webapp/applications).
## Add Custom Speech Vendors
If the desired vendor is not included in the list of preinstalled vendors,
or if you want to modify the configuration of an existing one, you can add a custom vendor.
Before adding a vendor to the Voice Gateway, you need to create it.
To do this, use the [custom-speech-example](https://github.com/Cognigy/custom-speech-example/tree/main) template on GitHub.
Using the same template, you can customize vendors that are provided in it as examples, such as Google, AssemblyAI, and Vosk, or create a new one.
After you have created the custom provider, deploy it on a server,
for example, in the AWS Cloud, then copy the address of the custom provider for use in the Voice Gateway.
To add a custom speech vendor, follow these steps:
1. In the left-side menu of the Voice Gateway Self-Service Portal, select **Speech**.
2. On the **Speech services** page, click **Add speech service**.
3. On the **Add a speech service** page, select **Custom** from the **Vendor** list.
4. In the **Name** field, specify a unique name for your provider. You need to reuse this name in the Node configuration.
5. From the **Account** list, select a specific account or leave the **All accounts** value if you want the custom speech provider to be available for all accounts.
6. In the **Label** field, create a label only if you need to create multiple speech services from the same vendor. Then, in your [application](/voice-gateway/webapp/applications#add-additional-tts-and-stt-vendor), use the label to specify which service to use.
7. Activate the **Use for text-to-speech** setting to use this provider as a TTS vendor. Enter the TTS HTTP URL of the server where your custom vendor is deployed.
1. *(Optional)* If you enable TTS, the **Enable text-to-speech streaming** option appears. Activate this option to enable TTS streaming for your voice AI Agent. Note that some providers might not support TTS streaming. For more information, see [TTS Streaming](/voice-gateway/streaming).
8. Activate the **Use for speech-to-text** setting to use this provider as an STT vendor. Enter the STT WebSocket URL of the server where your custom vendor is deployed.
9. In the **Authentication Token** field, enter the key that you get from your TTS or STT vendor to set up a connection.
10. Click **Save**.
To start using your speech provider,
you need to specify the provider name in the **Custom** parameter of the relevant Nodes,
such as [Set Session Config](/ai/agents/develop/node-reference/voice/voice-gateway/set-session-config),
[Say](/ai/agents/develop/node-reference/basic/say), [Question](/ai/agents/develop/node-reference/basic/question) or [Optional Question](/ai/agents/develop/node-reference/basic/optional-question),
or [Session Speech Parameters Config](/ai/agents/develop/node-reference/voice/generic/session-speech-parameters-config).
## More Information
* [TTS and STT Vendors](/voice-gateway/references/tts-and-stt-vendors)
***
: The EU environment is isolated, and custom voices aren't available in it by default. To use custom voices in the EU environment, you need to share them from non-isolated environments. For more information on sharing resources from non-isolated environments, read the [respective instructions](https://elevenlabs.io/docs/product-guides/administration/data-residency#how-do-i-share-a-pvc-from-a-non-isolated-environment-to-an-isolated-environment) in the ElevenLabs documentation.
## Cloud-Based Speech Services
To configure the connection for a cloud-based speech service:
1. In the left-side menu of the Voice Gateway Self-Service Portal, select **Speech**.
2. Click **Add Speech Service** and select your preferred vendor.
3. Select the account you want to use it with.
4. *(Optional)* If you need to create multiple speech services from the same vendor, use the **Label** field to create a unique speech service.
5. Select **Speech-To-Text**, **Text-To-Speech** or both, depending on your use case.
1. *(Optional)* If you enable TTS, the **Enable text-to-speech streaming** option appears. Activate this option to enable TTS streaming for your voice AI Agent. Note that some providers might not support TTS streaming. For more information, see [TTS Streaming](/voice-gateway/streaming).
6. Follow further instructions according to your selected vendor:
1) Make sure you have set the following [IAM policies](https://docs.aws.amazon.com/IAM/latest/UserGuide/reference_policies_elements_statement.html):
To use Amazon Polly as a TTS service, you need at least the following IAM policy:
```json theme={null}
{
"Version": "2012-10-17",
"Statement": [
{
"Effect": "Allow",
"Action": [
"polly:SynthesizeSpeech",
"polly:DescribeVoices"
],
"Resource": "*"
}
]
}
```
Where:
* `polly:SynthesizeSpeech` — allows the service to synthesize speech.
* `polly:DescribeVoices` — allows the service to list the available voices.
* `*` — allows the service to access all resources. AWS doesn't support resource-level restrictions.
Voice Gateway uses real-time streaming transcription for speech recognition. To use Amazon Polly's speech services, you need to configure Amazon Transcribe's STT policy to allow real-time streaming transcription. To do so, configure at least the following IAM policies:
```json theme={null}
{
"Version": "2012-10-17",
"Statement": [
{
"Effect": "Allow",
"Action": [
"transcribe:StartStreamTranscription",
"transcribe:StartStreamTranscriptionWebSocket"
],
"Resource": "*"
}
]
}
```
Where:
* `transcribe:StartStreamTranscription` — allows the service to start a real-time streaming transcription.
* `transcribe:StartStreamTranscriptionWebSocket` — allows the service to start a real-time streaming transcription via WebSocket.
* `*` — allows the service to access all resources. AWS doesn't support resource-level restrictions.
2. Enter the Access Key in the **Access key ID** field. For more information on AWS Access Keys, read the [Amazon AWS](https://repost.aws/knowledge-center/create-access-key) documentation.
3. Enter the Secret Access Key in the **Secret access key** field.
4. Select a region from the **Region** list.
Use Deepgram for TTS. For STT capabilities, use Deepgram Flux, which is optimized for transcription accuracy, real-time streaming, and processing large volumes of audio.
1. Enter an API key in the **API key** field. This key also works for Deepgram Flux. For more information on API keys in Deepgram, read the [Deepgram](https://developers.deepgram.com/docs/create-additional-api-keys) documentation.
2. From the **Region** list, select one of the following regions to host the data processed by Deepgram:
* **United States** — points to the endpoint for Deepgram services located in the U.S.
* **EU** — points to the endpoint for Deepgram services located in the EU.
1. Enter an API key in the **API key** field. If you have configured Deepgram before, you can reuse the same key for Deepgram Flux because the API key works for both Deepgram and Deepgram Flux. For more information on API keys in Deepgram, read the [Deepgram](https://developers.deepgram.com/docs/create-additional-api-keys) documentation.
2. From **Region** list, select one of the following regions to host the data processed by Deepgram Flux:
* **United States** — points to the endpoint for Deepgram Flux services located in the U.S.
* **EU** — points to the endpoint for Deepgram Flux services located in the EU.
1. Select your language model from the **Model** list. The following TTS models are supported:
* Multilingual v3
* Multilingual v2
* English v2
* Turbo v2 (deprecated)
* Turbo v2.5 (deprecated)
* Flash v2
* Flash v2.5
2. Select **Use hosted ElevenLabs service** and configure the following:
* **Region** — select the region to host the data processed by ElevenLabs:
* **Global** — points to the endpoint for ElevenLabs services located in the U.S.
* **EU**[1](#footnote1) — points to the endpoint for ElevenLabs services located in the EU. Selecting data residency is an ElevenLabs Enterprise feature. For more information, read the ElevenLabs documentation on [Data Residency](https://elevenlabs.io/docs/product-guides/administration/data-residency). The EU environment doesn't support legacy voices. Legacy voices include a legacy tag in the voice selection in Cognigy.AI. If you select the EU region, ensure you don't select legacy voices.
* **API key** — enter an API key. For more information on ElevenLabs API keys, read the [ElevenLabs](https://help.elevenlabs.io/hc/en-us/articles/14599447207697-How-to-authorize-yourself-using-your-xi-api-key) documentation.
1. Upload your Service Key to the **Service key** field. For more information on creating Service Keys in Google Cloud, read the [Google Cloud](https://cloud.google.com/iam/docs/keys-create-delete) documentation.
1. Select **Use hosted Azure service**.
2. Select a region from the **Region** list.
3. Enter an API key in the **API key** field. For more information on linking API keys, read the [Microsoft Speech Services Billing](https://learn.microsoft.com/en-us/azure/ai-services/speech-service/speech-container-howto#billing-arguments) documentation.
4. *(Optional)* Select a custom voice model for TTS by providing a custom voice endpoint ID in the **Custom voice deployment ID** field.
5. *(Optional)* Select a custom speech model for STT by providing a custom speech endpoint ID in the **Custom speech endpoint ID** field.
1. Enter the client ID in the **Client ID** field. You can obtain the client ID as well as the secret key from your Nuance program manager. For more information, read the [Nuance](https://docs.nuance.com/digital-engagement/APIs/UMAPI/token-auth.html) documentation.
2. Enter the secret key in the **Secret** field.
This feature is hidden behind the feature flag. Activate Speechmatics:
* If you have a SaaS installation, contact [Cognigy technical support](/help/get-help).
* If you have an on-premises installation, specify the following feature flags in `values.yaml` for the following products:
```yaml Voice Gateway theme={null}
webapp:
extraEnvVars:
- name: ENABLE_SPEECHMATICS
value: "true"
```
```yaml Cognigy.AI theme={null}
cognigyEnv:
FEATURE_ENABLE_SPEECHMATICS_SPEECH_VENDOR: "true"
```
1. Enter an API key in the **API key** field. For more information on Speechmatics API keys, read the [Speechmatics Authentication Guide](https://docs.speechmatics.com/get-started/authentication#create-an-api-key).
2. From **Region** list, select one of the following regions to host the data processed by Speechmatics:
* **EU (EU2 - On Demand)** — points to the on-demand endpoint for Speechmatics services located in the EU.
* **EU (EU1 - Enterprise)** — points to the enterprise endpoint for Speechmatics services located in the EU.
* **US (US1 - Enterprise)** — points to the enterprise endpoint for Speechmatics services located in the U.S.
Save your changes by clicking **Save**.
Once you have created a speech service, add this service to the [Application](/voice-gateway/webapp/applications).
## On-Premises Speech Services
1. In the left-side menu of the Voice Gateway Self-Service Portal, select **Speech**.
2. Click **Add Speech Service** and select your preferred vendor.
3. Select the account you want to use it with.
4. *(Optional)* If you need to create multiple speech services from the same vendor, use the **Label** field to create a unique speech service.
5. Select **Speech-To-Text**, **Text-To-Speech** or both, depending on your use case.
1. *(Optional)* If you enable TTS, the **Enable text-to-speech streaming** option appears. Activate this option to enable TTS streaming for your voice AI Agent. Note that some providers might not support TTS streaming. For more information, see [TTS Streaming](/voice-gateway/streaming).
6. Follow further instructions according to your selected vendor:
1) Select **Use on-prem Deepgram container**.
2) Enter the container URI for STT and TTS in the **Container URI** field.
3) Select **Use TLS**, if required.
1. Select **Use on-prem TTS** and enter the IP port in the **TTS URI** field.
2. Select **Use on-prem STT** to enter the IP port in the **STT URI** field.
1. Select **Use Azure Docker container (on-prem)**.
2. Enter the container URL for TTS in the **Container URL for TTS** field.
3. Enter the container URL for STT in the **Container URL for STT** field.
4. Enter an API key in the **Subscription key** field, if required. Whether the subscription key is required will depend on your custom on-premises setup. For more information on Microsoft Azure Subscriptions, read the [Subscriptions in Azure API Management](https://learn.microsoft.com/en-us/azure/api-management/api-management-subscriptions) documentation.
Save your changes by clicking **Save**. Once you have created a speech service, add this service to the [Application](/voice-gateway/webapp/applications).
## Add Custom Speech Vendors
If the desired vendor is not included in the list of preinstalled vendors,
or if you want to modify the configuration of an existing one, you can add a custom vendor.
Before adding a vendor to the Voice Gateway, you need to create it.
To do this, use the [custom-speech-example](https://github.com/Cognigy/custom-speech-example/tree/main) template on GitHub.
Using the same template, you can customize vendors that are provided in it as examples, such as Google, AssemblyAI, and Vosk, or create a new one.
After you have created the custom provider, deploy it on a server,
for example, in the AWS Cloud, then copy the address of the custom provider for use in the Voice Gateway.
To add a custom speech vendor, follow these steps:
1. In the left-side menu of the Voice Gateway Self-Service Portal, select **Speech**.
2. On the **Speech services** page, click **Add speech service**.
3. On the **Add a speech service** page, select **Custom** from the **Vendor** list.
4. In the **Name** field, specify a unique name for your provider. You need to reuse this name in the Node configuration.
5. From the **Account** list, select a specific account or leave the **All accounts** value if you want the custom speech provider to be available for all accounts.
6. In the **Label** field, create a label only if you need to create multiple speech services from the same vendor. Then, in your [application](/voice-gateway/webapp/applications#add-additional-tts-and-stt-vendor), use the label to specify which service to use.
7. Activate the **Use for text-to-speech** setting to use this provider as a TTS vendor. Enter the TTS HTTP URL of the server where your custom vendor is deployed.
1. *(Optional)* If you enable TTS, the **Enable text-to-speech streaming** option appears. Activate this option to enable TTS streaming for your voice AI Agent. Note that some providers might not support TTS streaming. For more information, see [TTS Streaming](/voice-gateway/streaming).
8. Activate the **Use for speech-to-text** setting to use this provider as an STT vendor. Enter the STT WebSocket URL of the server where your custom vendor is deployed.
9. In the **Authentication Token** field, enter the key that you get from your TTS or STT vendor to set up a connection.
10. Click **Save**.
To start using your speech provider,
you need to specify the provider name in the **Custom** parameter of the relevant Nodes,
such as [Set Session Config](/ai/agents/develop/node-reference/voice/voice-gateway/set-session-config),
[Say](/ai/agents/develop/node-reference/basic/say), [Question](/ai/agents/develop/node-reference/basic/question) or [Optional Question](/ai/agents/develop/node-reference/basic/optional-question),
or [Session Speech Parameters Config](/ai/agents/develop/node-reference/voice/generic/session-speech-parameters-config).
## More Information
* [TTS and STT Vendors](/voice-gateway/references/tts-and-stt-vendors)
***
: The EU environment is isolated, and custom voices aren't available in it by default. To use custom voices in the EU environment, you need to share them from non-isolated environments. For more information on sharing resources from non-isolated environments, read the [respective instructions](https://elevenlabs.io/docs/product-guides/administration/data-residency#how-do-i-share-a-pvc-from-a-non-isolated-environment-to-an-isolated-environment) in the ElevenLabs documentation.